Ever been running or biking with your favorite song pumping through the headphones, when suddenly it reaches the end and you wish you could replay it without stopping to pull your iPhone out? Or have you ever felt the urge to skip that song you really don’t like? That’s happened to me on more than one occasion, so I decided to build a simple Bluetooth device that interfaces with my iPhone to control my music.
There are many ways I could have accomplished this, but I chose to use an RFduino chip as my hardware platform, which is essentially a shrunk-down Arduino with built in Bluetooth support. I also had to create an iOS app to receive the commands via Bluetooth and adjust the currently playing music accordingly.
In part 1 of this series of posts, I’ll dive into some of the details on writing the code for the RFduino. The iOS app will be covered in part 2. The full source for the iOS app and the RFduino code is available on GitHub here.
RFduino: The Hardware
The RFduino chip is essentially a scaled-down version of Arduino with a built-in Bluetooth 4.0 Low Energy chip, which is exactly what I needed for this project. There are a number of “shields” available that can be stacked on the main RFduino board to provide additional components, such as the CR2032 Coin Battery Shield and the RGB Pushbutton Shield. This made it very easy to develop a prototype without any soldering whatsoever. The USB Shield is required in order to load code onto the chip, and also provides power to the RFduino while connected to a USB port (don’t use the CR2032 and USB shield at the same time!)
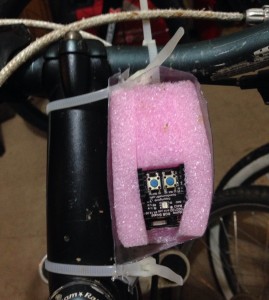
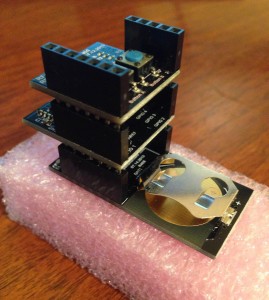
As you can see in the first image below, I’ve attached the RFduino with the RGB Pushbutton Shield on top to my bicycle handlebars, using part of the plastic casing that the chip came in, some foam, and a few zip-ties. The second image shows the RFduino outside of the casing with both the CR2032 Coin Battery Shield and RGB Pushbutton Shield attached.


Since I only had two buttons to work with, I set up one to advance to the next song and the other to backtrack to the previous song. Holding either button for more than 3 seconds will put the device into “sleep” mode, from which it can be woken by pressing either button again. I used the RGB LED to indicate status. Solid red indicates that the device is broadcasting its advertisement package, but has no active connection to an iPhone. The LED turns green when the device is connected. Flashing red signifies that the RFduino is about to shut down, and it flashes blue during a data transmission.
Coding for the RFduino
The first thing to know about coding for the RFduino is that you can use the normal Arduino Development Environment. There are a few specifics that need to be done to get it to work, so you’ll want to be sure to follow the instructions found in the readme of the RFduino repository on GitHub. As far as actual coding goes, for the most part it is very similar to writing code for a regular Arduino. RFduino also has a nice library of functions that provide easy access to Bluetooth functionality and the I/O pins.
The RFduino sketch and additional C++ files can be found within the GitHub repo under /RFduinoSketches/Remote. You’ll notice that besides the main sketch (Remote.ino), there are also files for classes called MultiColorLed and Button. These encapsulate some of the basic code to interface with the LED and buttons.
The MultiColorLed Class
The MultiColorLed class is pretty simple and straightforward. The one thing to note though, is that calling the Blink or BlinkAndRestoreState method is synchronous. That is, other code will not execute until the LED has finished blinking and the method returns.
void MultiColorLed::Blink(int onTime, int offTime, int cycles)
{
    for (int i = 0; i < cycles; i++)
    {
        TurnOn();
        delay(onTime);
        TurnOff();
        if (i < cycles - 1) delay(offTime);
    }
}
BlinkAndRestoreState is essentially the same as Blink, except that it restores the LED to the state it was in before blinking began, whereas the Blink method will leave the LED off at the end.
void MultiColorLed::BlinkAndRestoreState(int onTime, int offTime, int cycles, Color newColor)
{
    // save current state
    Color prevColor = color;
    bool wasOn = isOn;

    // blink
    Blink(onTime, offTime, cycles, newColor);

    // restore previous state
    color = prevColor;
    isOn = wasOn;
    UpdateOutput();
}
The Button Class
Moving on to the Button class, the two main methods of interest are bool Button::Debounce(int state) and int Button::GetHoldDuration(). The Debounce method takes as input an integer specifying which state to test the button for, which should be LOW (button up) or HIGH (button down). The boolean return value indicates whether the actual button state matched the state parameter.
The Debounce method also tracks when the state changes, saving the state change time for use in the GetHoldDuration method. The important thing to remember here is that the accuracy of the hold duration is proportionate to the frequency that the Debounce method is called, because the button state is only checked at those specific times.
bool Button::Debounce(int state)
{
    // debounceInternal contains the actual debouncing logic
    bool result = debounceInternal(state);

    if (state == HIGH && result && lastPressTime == -1)
        lastPressTime = millis();
    else if (state == LOW && result && lastPressTime != -1)
    {
        lastHoldDuration = millis() - lastPressTime;
        lastPressTime = -1;
    }

    return result;
}

int Button::GetHoldDuration()
{
    if (lastPressTime != -1)
        return millis() - lastPressTime;
    else
        return lastHoldDuration;
}
Remote.ino
Finally, let’s move on to the real meat of the code: the Remote.ino sketch file. Starting at the top of the file around lines 7-20, we see some basic declarations for colors, the LED, and the buttons. Immediately after that is the setup method. This method is called when the device powers on, including powering back up after it has been shut down by a call to RFduino_systemOff() (you can find this in the shutdown method at the bottom of the Remote.ino file).
void setup() {
    // set the data rate in bits for serial data transmission
    Serial.begin(9600);

    // this is the data we want to appear in the advertisement
    // (the deviceName length plus the advertisement length must be <= 18 bytes
    RFduinoBLE.advertisementData = "rspotify";

    // set the power level to a low value since the distance between the RFduino and iPhone should be minimal
    RFduinoBLE.txPowerLevel = -20;

    // start the BLE stack
    Serial.println("Starting BLE stack");
    RFduinoBLE.begin();

    // setup pinwake callbacks
    Serial.println("Configuring pinWake callbacks");
    RFduino_pinWakeCallback(nextBtn.GetPin(), HIGH, nextBtnPressed);
    RFduino_pinWakeCallback(prevBtn.GetPin(), HIGH, prevBtnPressed);

    // turn on red led to indicate no connection
    led.TurnOn(red);
}
The calls to Serial.println are simply a way to send log and debug information back to a computer when the RFduino is attached through the USB shield. This data can be accessed from the Arduino Development Environment by selecting Serial Monitor from the Tools menu.
The calls to RFduino_pinWakeCallback are where we hook up callbacks to handle button presses. The first parameter is the PIN number of the button to watch, the second parameter is the state to watch for (in this case HIGH, or button down), and the third parameter is the name of the method that will be called when the button is pressed.
The code snippet below shows the callback methods that handle the button presses. Both are essentially the same, the only real difference being the value that is sent over the Bluetooth connection. The purpose of the return value of these methods is to indicate whether the device should come out of low power mode or not. The low power mode that I am referring to here can be entered by calling RFduino_ULPDelay(INFINITE), which we’ll see in the main loop of the program.
int nextBtnPressed(uint32_t ulPin)
{
    Serial.println("Entered nextBtn pinwake callback");
    if (nextBtn.Debounce(HIGH))
    {
    Serial.println("Sending nextBtn signal");
    RFduinoBLE.send(0);
    led.BlinkAndRestoreState(300, 0, 1, blue);
    return 1;
    }

    return 0;  // don't exit RFduino_ULPDelay
}

int prevBtnPressed(uint32_t ulPin)
{
    Serial.println("Entered prevBtn pinwake callback");
    if (prevBtn.Debounce(HIGH))
    {
    Serial.println("Sending prevBtn signal");
    RFduinoBLE.send(1);
    led.BlinkAndRestoreState(300, 0, 1, blue);
    return 1;
    }

    return 0;  // don't exit RFduino_ULPDelay
}
The loop() method is the main execution loop, as you probably guessed. The first thing we do is enter low power mode by calling RFduino_ULPDelay(INFINITE), which suspends further execution of the main loop until a button press wakes it up (as mentioned above, whether or not it wakes up is determined by the return value of the callback method). The cool thing about this is that it still has the ability to make a connection, send/receive data and watch for button presses.
void loop() {
    Serial.println("Entering ULPDelay(INFINITE) in delay_until_button");
    // switch to lower power mode until a button edge wakes us up
    RFduino_ULPDelay(INFINITE);
    Serial.println("Leaving ULPDelay(INFINITE) in delay_until_button");

    // clear pin wake when the button is released - this will cause it to enter low power mode the next time through the loop
    if ((RFduino_pinWoke(nextBtn.GetPin()) && nextBtn.Debounce(LOW)) || (RFduino_pinWoke(prevBtn.GetPin()) && prevBtn.Debounce(LOW)))
    {
        RFduino_resetPinWake(nextBtn.GetPin());
        RFduino_resetPinWake(prevBtn.GetPin());
    }

    // if any button has been down for over 3 seconds, shut down
    if (nextBtn.GetHoldDuration() > 3000 || prevBtn.GetHoldDuration() > 3000)
        shutdown();
}
The only other thing we do in the loop is check if the button state has returned to LOW (unpressed), and shutdown the RFduino if a button has been held for more than 3 seconds. When the button has been released, we need to clear the pin wake using RFduino_resetPinWake. Until this happens, the device will not re-enter low power mode when RFduino_ULPDelay(INFINITE) is called and will therefore continue loop.
Something I want to point out is that the method shown here for determining the length of time that a button is held down for is the only way I could get it to work. I originally tried reconfiguring the pin wake callbacks immediately after a button press to watch for the button state to revert back to normal, but that just doesn’t work. Attempting to set additional callbacks in the setup method does not work either. I spent a bit of time figuring that one out, so just keep it in mind.
Conclusion… (until part 2)
That pretty much covers the RFduino side of things. There are a couple of things I didn’t go over, but they should be self-explanatory just by looking at the code. Keep an eye out for part 2, where I’ll get into the details of the iOS app!

Permalink
Your code was really helpful to solve a problem I had in another project. Thanks for sharing your knowledge!
Permalink
Very helpful ^_^ even though i have a different project. Explanation is done well. (y)